View in gallery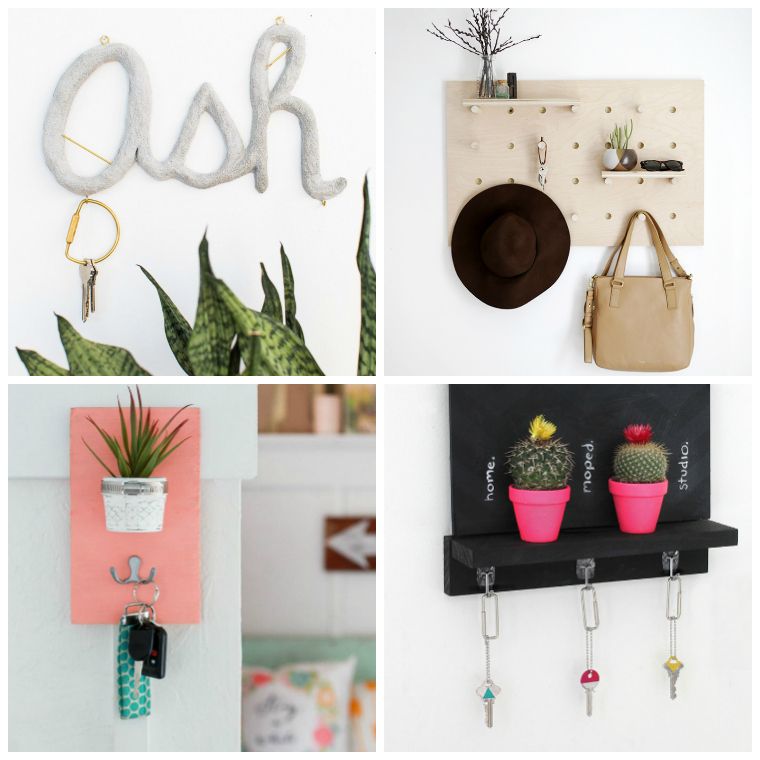 Do-it-yourself wall key holder: 6 original DIY decoration tutorials | 1/31
Among DIY deco projects that make us crack, those of wall keychain manufacture occupy a place apart. Small object that we tend to neglect, it has the ability to make our daily lives easier by helping us find our keys more easily.
Installed on the wall of our entrance, it is a great way to show off your creative talents to anyone who crosses the threshold of our homes. In wood, concrete, slate,
the self-made wall keychain comes in several creative versions.
Which would be ideal for your living space? Designmag offers you a collection of 6 unique projects and tutorials. And we challenge you. Select the model that tells you the most and inspire yourself to improve the organization of your accessories!
Wall key holder with decorative flower pot
View in gallery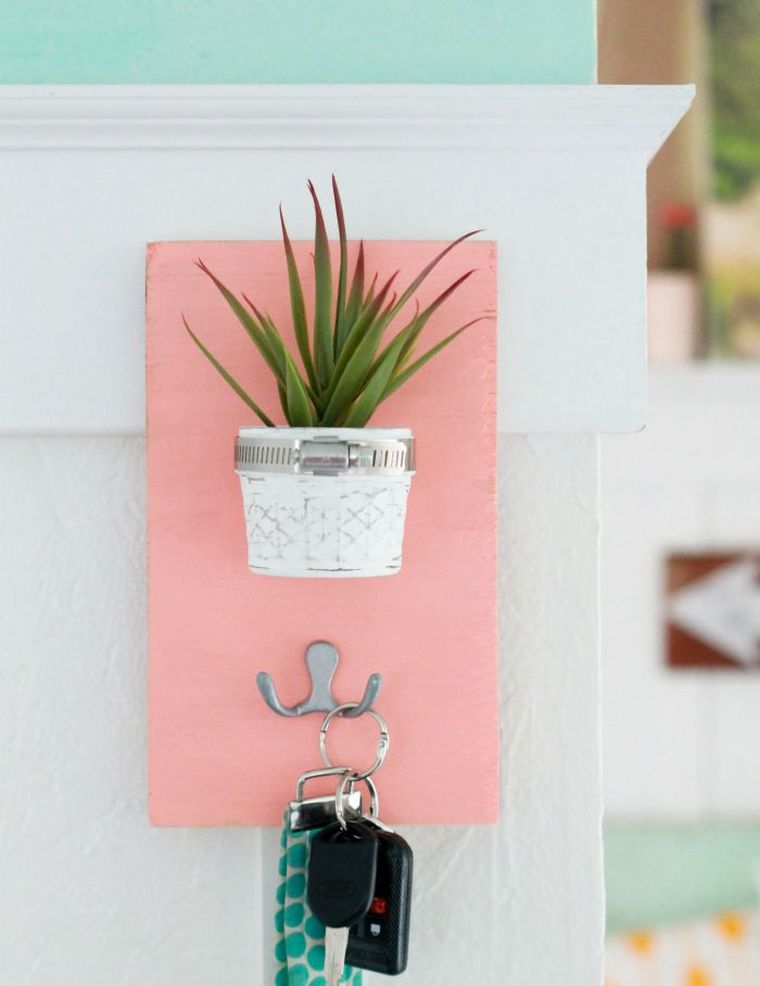 Do-it-yourself wall key holder: 6 original DIY decoration tutorials | 2/31
Wood is one of the favorite materials of many do-it-yourselfers. One or two planks of wood are often all that one needs to offer a convenient and cheap storage. And that’s exactly what Kelli and Kristi thought of the Lollyjane blog. So what are the other materials needed for this project DIY wall key holder quick and easy!
View in gallery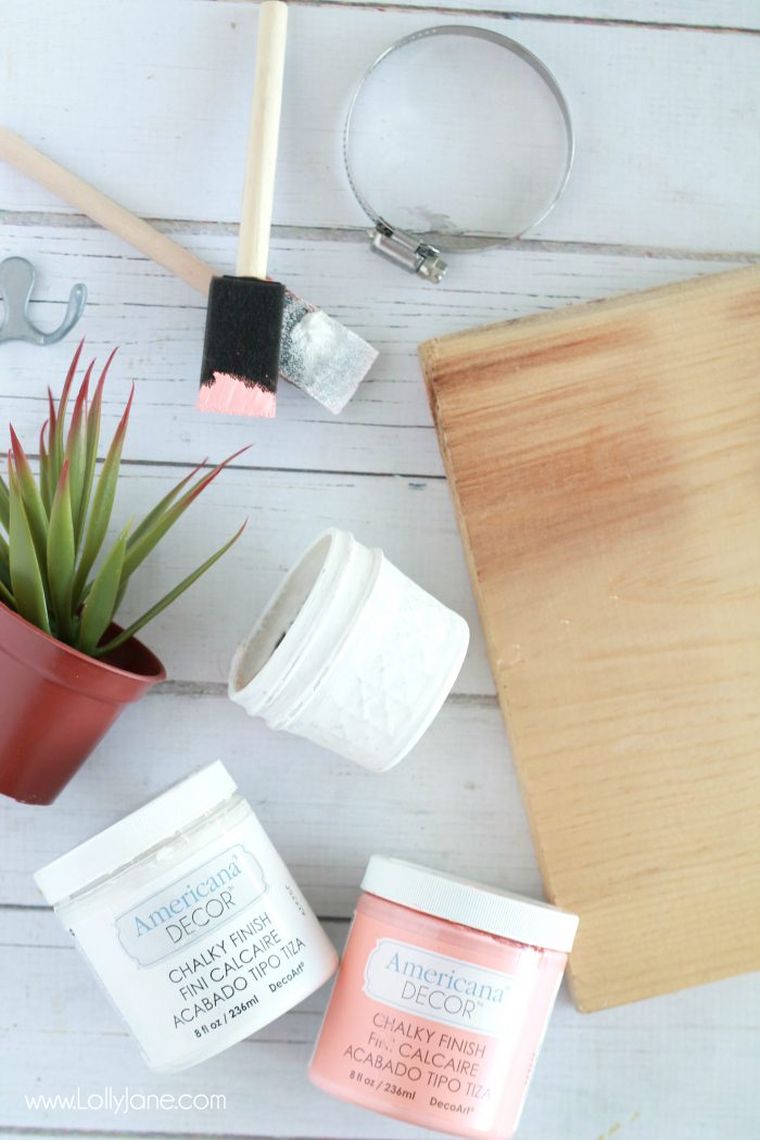 Do-it-yourself wall key holder: 6 original DIY decoration tutorials | 3/31
The first step in the production of this wall keyring is to gather the necessary materials. We will need a wooden board, two-color paint (optional: slate finish), a small jar or flower pot, a succulent plant (natural or artificial), a metal clamp , a foam brush and a hook.
View in gallery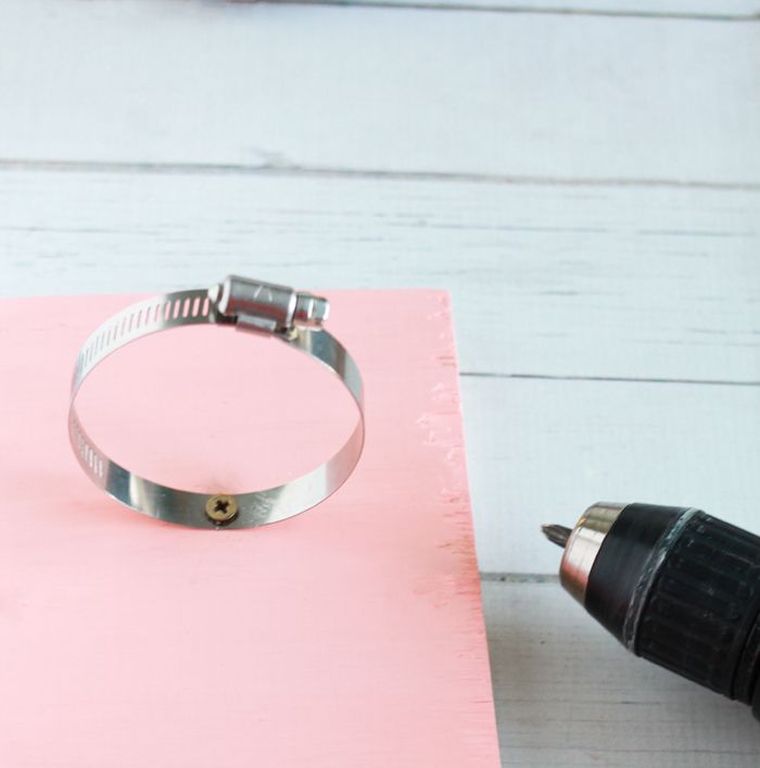 Do-it-yourself wall key holder: 6 original DIY decoration tutorials | 4/31
To begin, we take care of painting the wood board. We can also opt for another decoration technique, such as cutting or aging wood. Then, make a hole in the clamp with a nail. This step is to facilitate the attachment of the collar on your board; a screw will penetrate more difficult if we decided to skip this part of the tutorial. Before going to the next step, we install the necklace on the wooden board.
View in gallery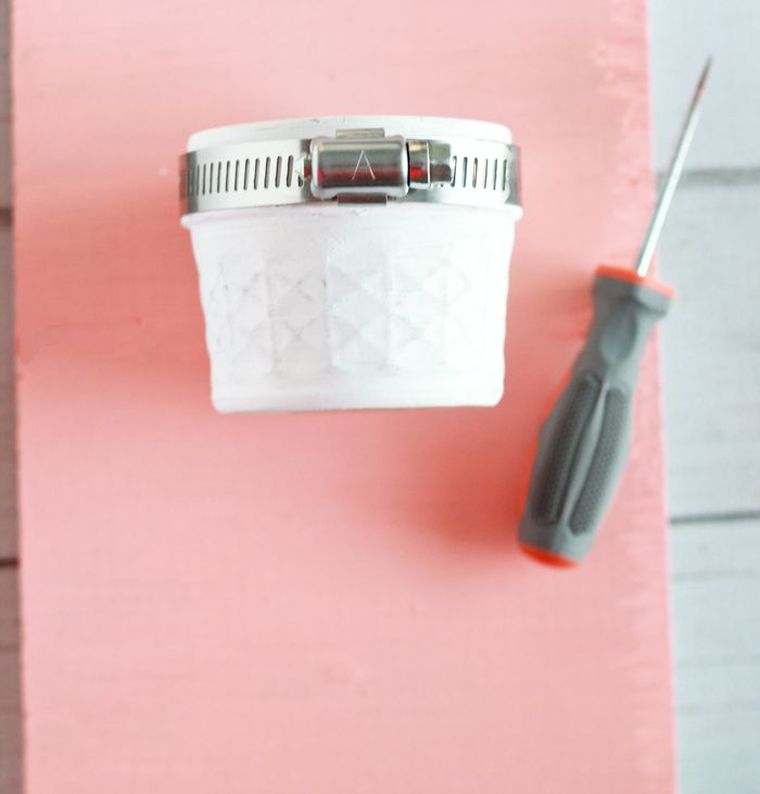 Do-it-yourself wall key holder: 6 original DIY decoration tutorials | 5/31
We continue by painting the jar or the flower pot; let it dry and attach it to the board with the clamp. Then we take the plant and put it in the container already installed on the wooden support.
View in gallery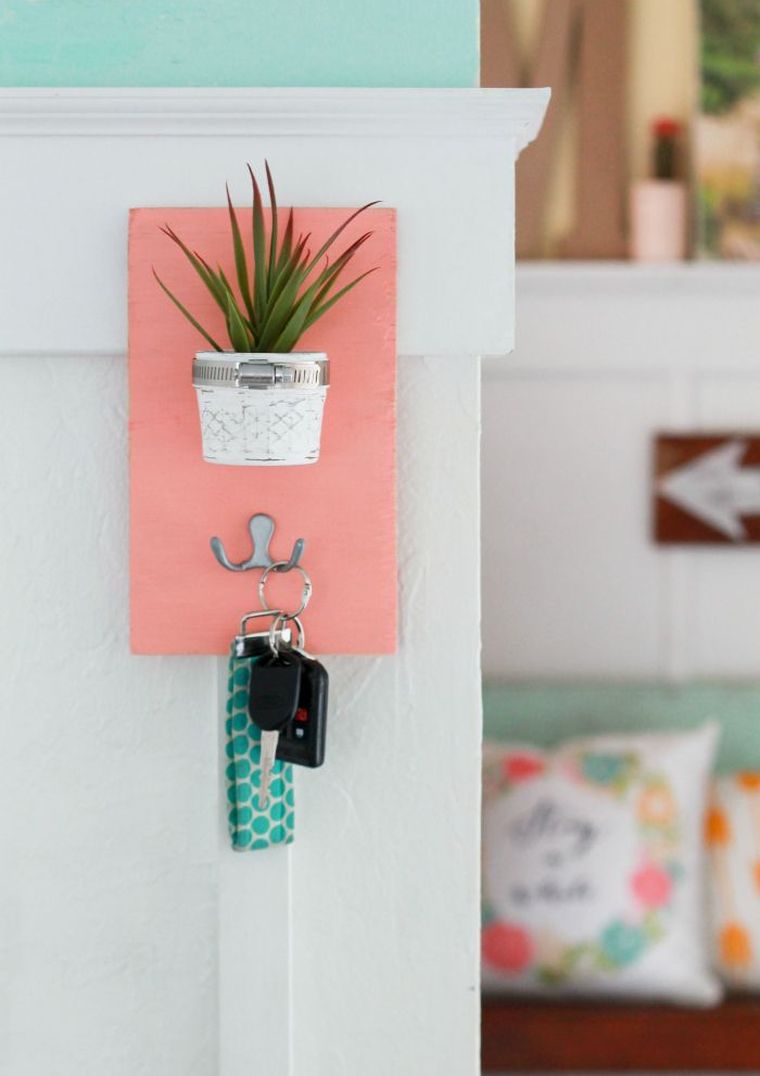 Do-it-yourself wall key holder: 6 original DIY decoration tutorials | 6/31
Finally, we attach the hook on the board. Once this step is complete, you are ready to put your original wall key ring on a vertical surface near your front door.
Wall mounted key ring DIY tutorial with open shelves to do it yourself
View in gallery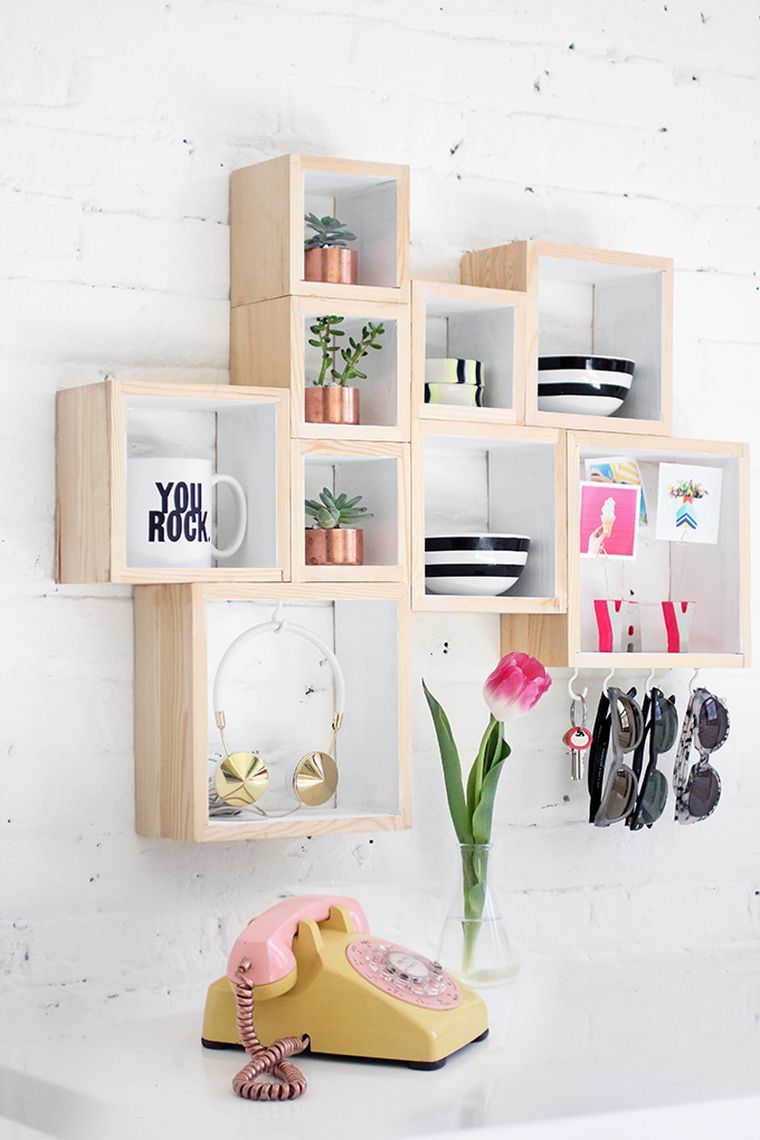 Do-it-yourself wall key holder: 6 original DIY decoration tutorials | 7/31
The idea of making a wooden wall keychain seduced you but you want a little more storage space? Try the following project proposed by I Spy DIY! Here are the materials needed for its realization: glue for wood, wooden crates, white paint, a brush, screw hooks.
View in gallery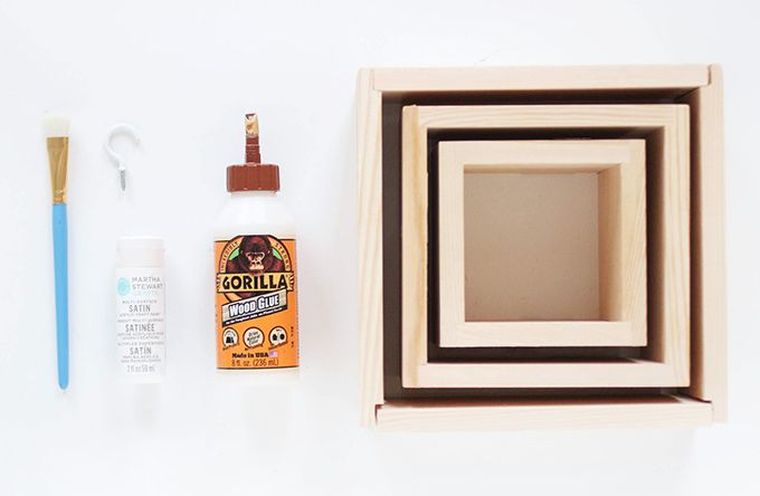 Do-it-yourself wall key holder: 6 original DIY decoration tutorials | 8/31
As always, we start by putting all the necessary materials on the worktop. Then, we start quietly in this project of manual activity by gluing the boxes with the wood glue. The resulting wall shelf is allowed to dry for 24 hours.
View in gallery Do-it-yourself wall key holder: 6 original DIY decoration tutorials | 9/31
Once this time has passed, we go back to DIY with the next step. It consists of painting the wooden surfaces with white paint; we decide if we want to paint the entire shelf or its interior parts only. Of course, let it dry before continuing with the tutorial.
View in gallery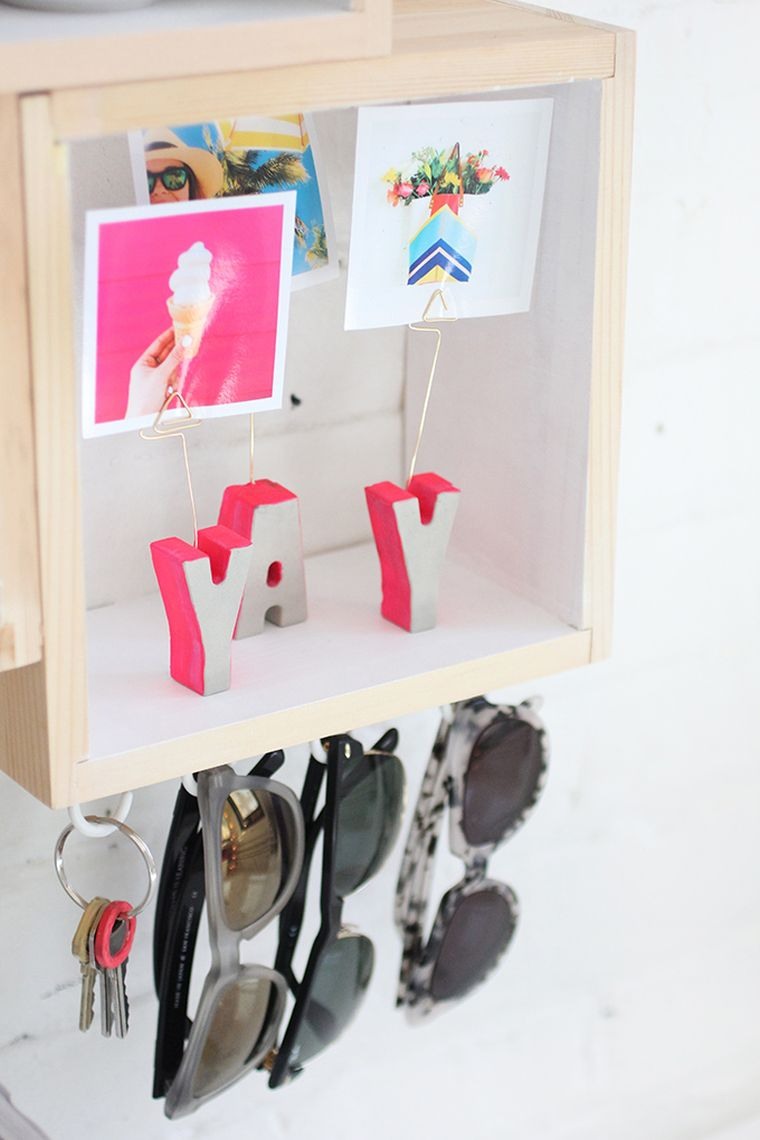 Do-it-yourself wall key holder: 6 original DIY decoration tutorials | 10/31
The screw hooks are installed on the bottom of his improvised wall storage. Self-made shelves are now ready to be hung on a wall of your driveway!
View in gallery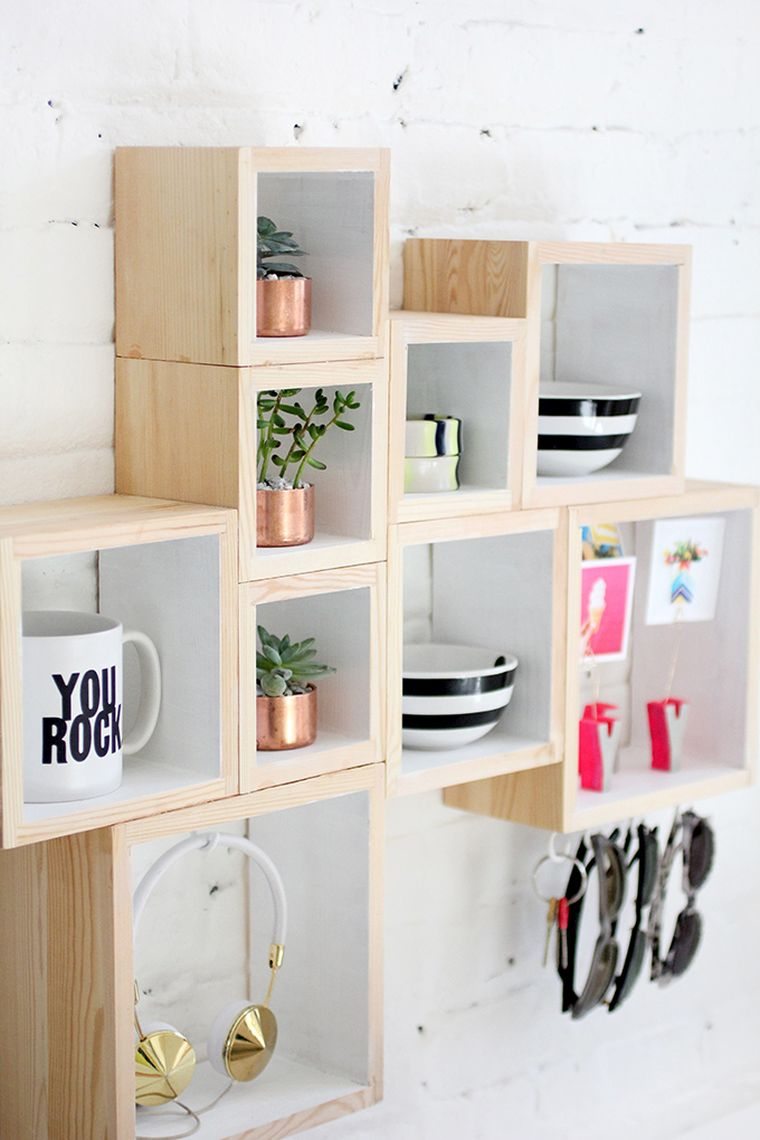 Do-it-yourself wall key holder: 6 original DIY decoration tutorials | 11/31
Finally, we decorate its storage with wall keyring a selection of various accessories.
How to make an original wall keyring made of concrete
View in gallery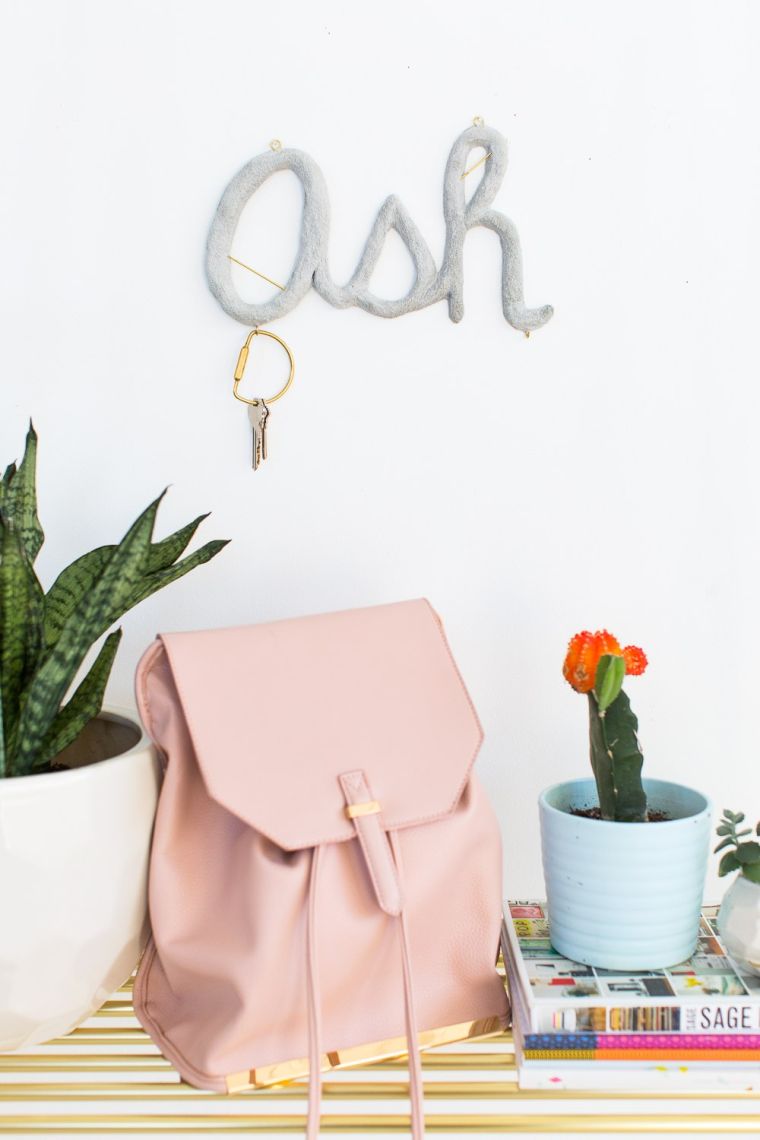 Do-it-yourself wall key holder: 6 original DIY decoration tutorials | 12/31
Let’s vary the materials a bit and go to an original tutorial that shows us how to make a wall keyring concrete. Designed by Ashley Rose from Sugar and Cloth, this wall decor accessory is inspired by the latest trends in interior design. It adds to the cold surface of concrete metallic glossy touches, very fashionable at the moment.
View in gallery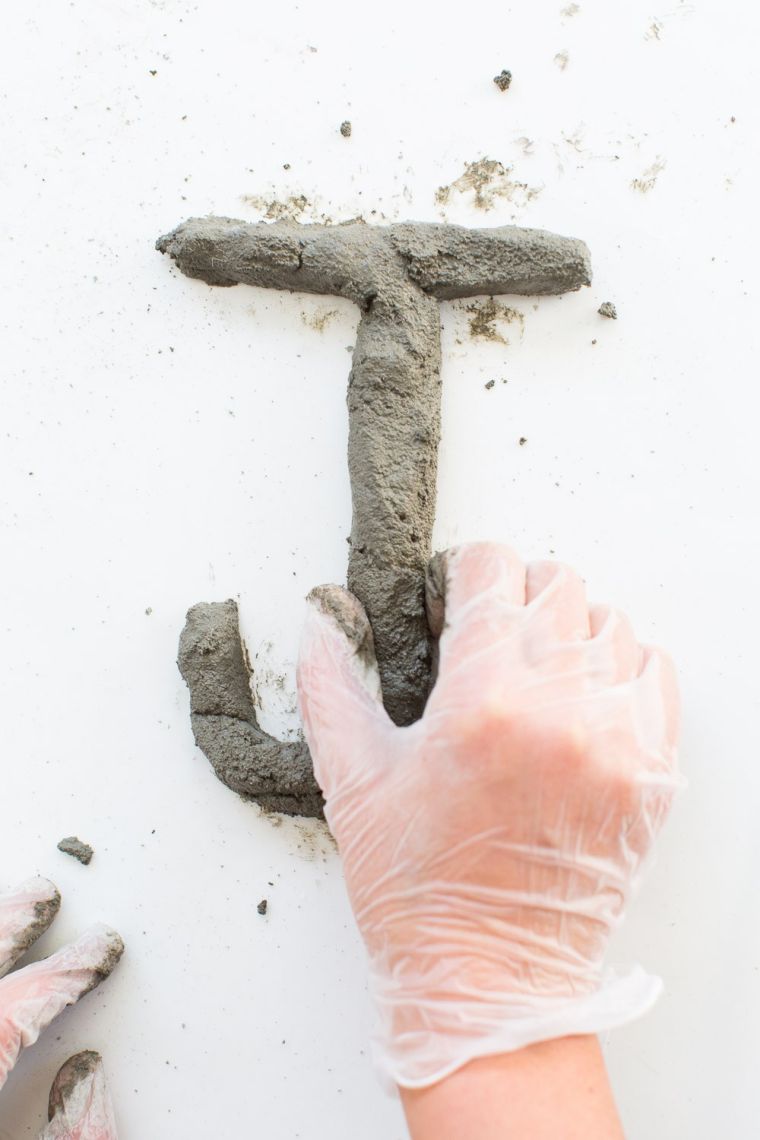 Do-it-yourself wall key holder: 6 original DIY decoration tutorials | 13/31
To make a concrete wall key ring, you first have a mixture of decorative concrete, a metal screw hook, a brush and a small container filled with water, waxed paper. (optional: gloves, some small metal sticks to add shiny keys).
View in gallery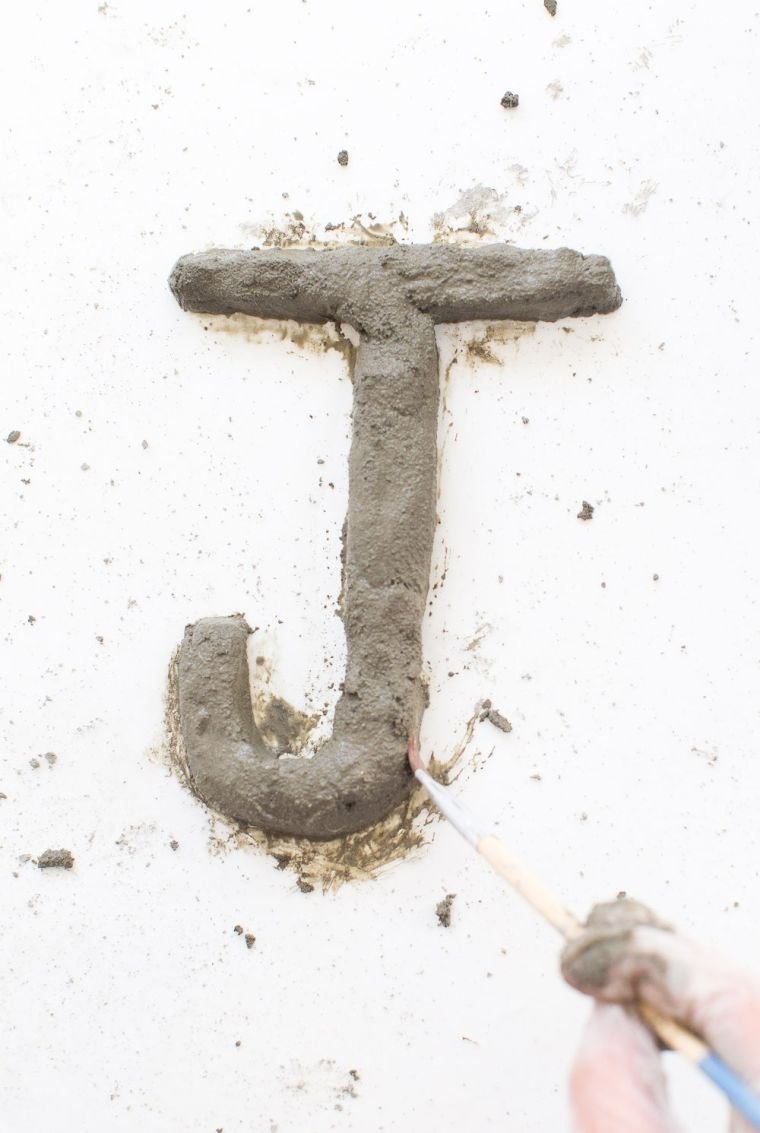 Do-it-yourself wall key holder: 6 original DIY decoration tutorials | 14/31
On his worktop, a sheet of wax paper is spread out and his decorative concrete mixture is prepared according to the instructions of his packaging. Once the mixture is ready, we realize the letters we would like to display near its front door. When we have obtained letters of a form that suits us, we work the details. With the help of the brush immersed in a little water, we clean the sides of the initials for a more professional rendering.
View in gallery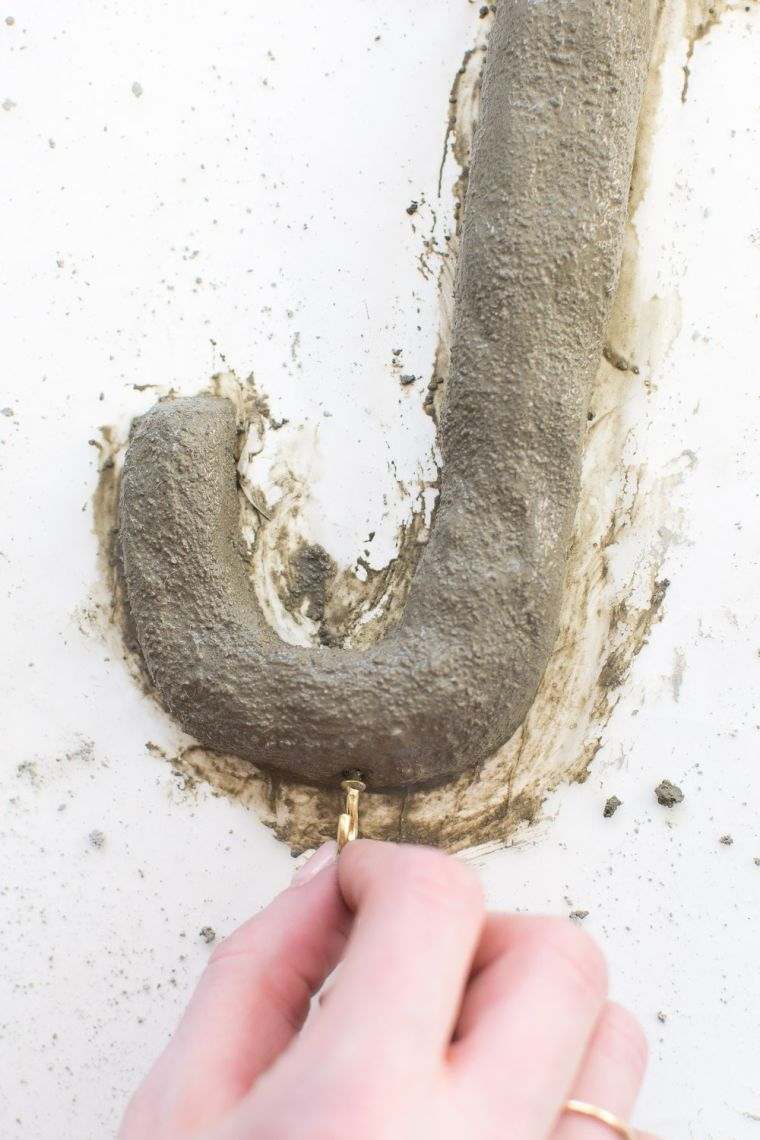
Do-it-yourself wall key holder: 6 original DIY decoration tutorials | 15/31
As long as the concrete is still easy to shape, you slip the end of a key hook inside a letter. Then, the rest of the hooks are used and introduced into the upper part of the initials; they will be used to fix the wall key holder on a vertical surface using screws or nails. If necessary, brushes are used to clean the area around the hooks.
View in gallery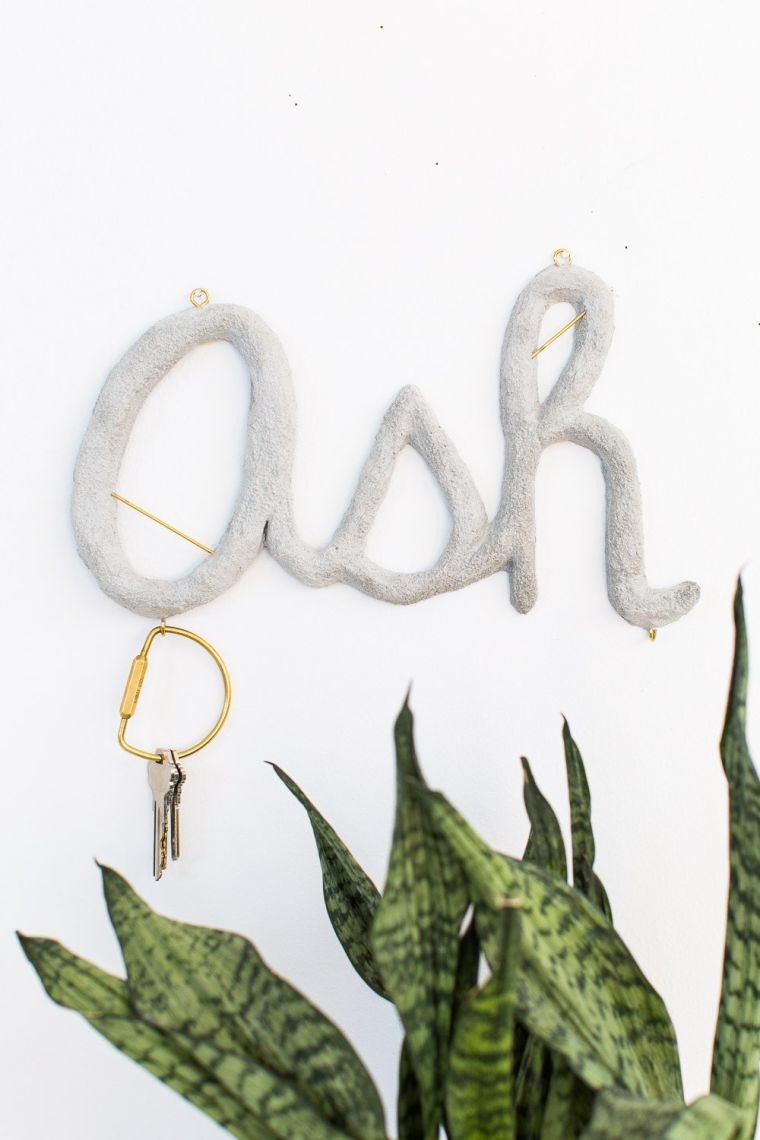 Do-it-yourself wall key holder: 6 original DIY decoration tutorials | 16/31
If you want to add decorative rods, then go to this stage, before letting the concrete dry for 48 hours. Once this time has passed, we are free to put his keychain with golden hooks on a wall.
Idea of making wall keychain with black slate
View in gallery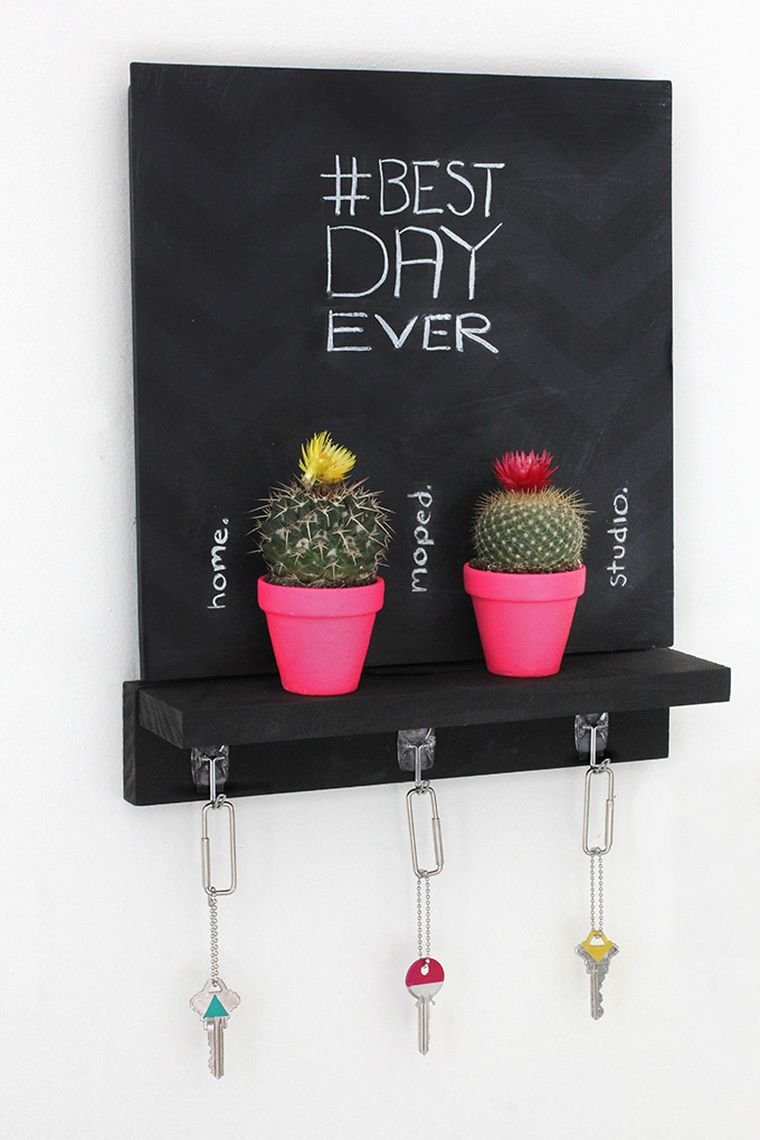 Do-it-yourself wall key holder: 6 original DIY decoration tutorials | 17/31
Why use natural wood when you can customize its surface according to your desires? The concept of the wall slate is just a simple and chic way to make your wall keyring more interesting. The I Spy DIY blog explains how to proceed!
View in gallery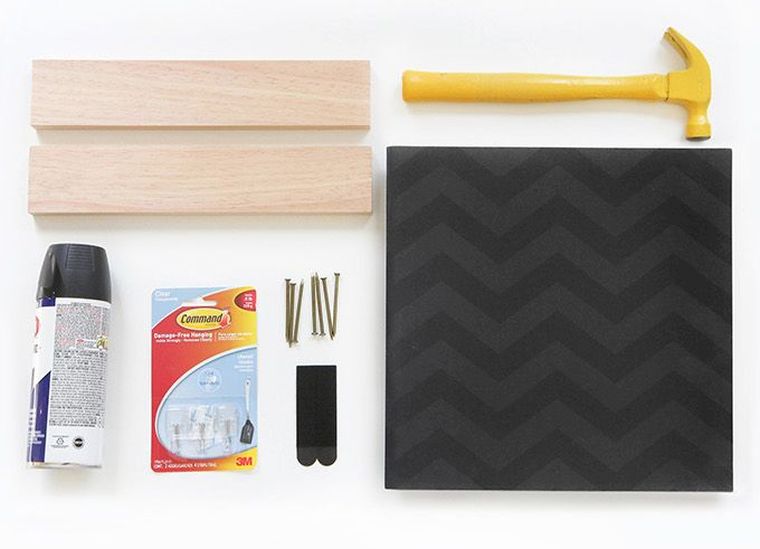 Do-it-yourself wall key holder: 6 original DIY decoration tutorials | 18/31
First of all, we equip ourselves with the necessary materials for this DIY deco tutorial: 2 wooden planks, nails, a hammer, chalk, slate paint, wood glue, a panel on which we will stick boards to install them on the wall (or an extra wooden board), key hooks.
View in gallery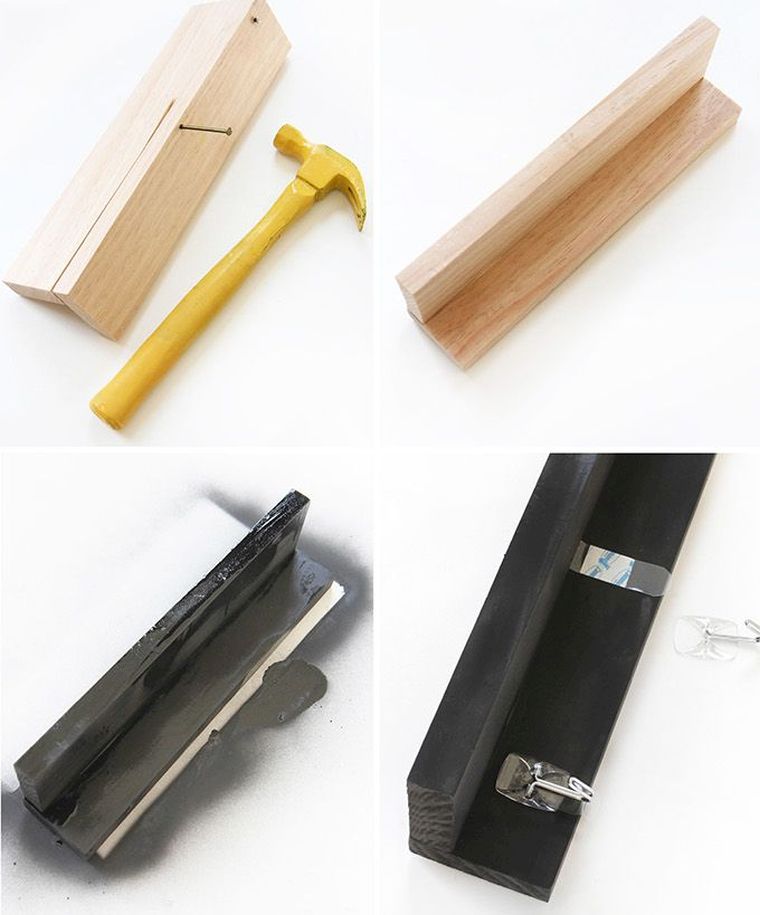 Do-it-yourself wall key holder: 6 original DIY decoration tutorials | 19/31
Then we go to the first step: the cutting of the wooden planks. Once cut, the boards are fixed together with nails (step 1 and 2 on the picture above). We then take care of painting boards with slate color and let it dry (step 3). To continue, we use glue and we fix the key hooks on the boards.
View in gallery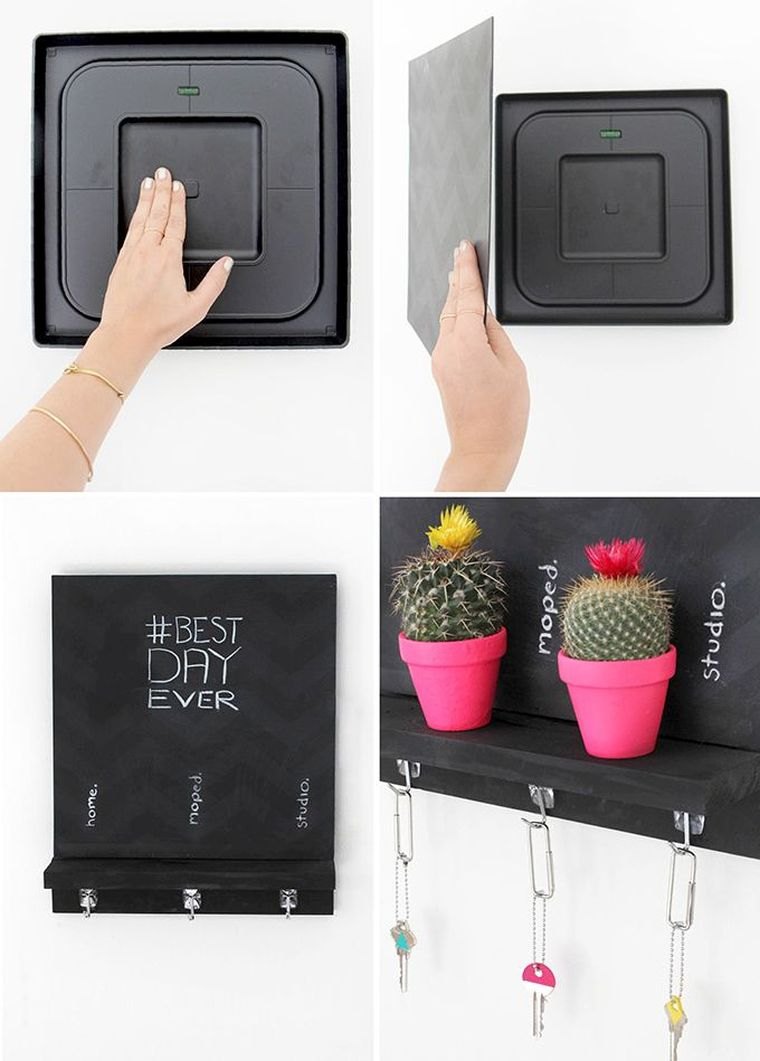 Do-it-yourself wall key holder: 6 original DIY decoration tutorials | 20/31
To mount the wall-mounted keychain more easily on a vertical surface, the boards are fixed on a wall decoration panel. It can be replaced by a simple wooden board (painted with slate paint beforehand). Finally, you put your cheap keychain in the hallway of his house.
View in gallery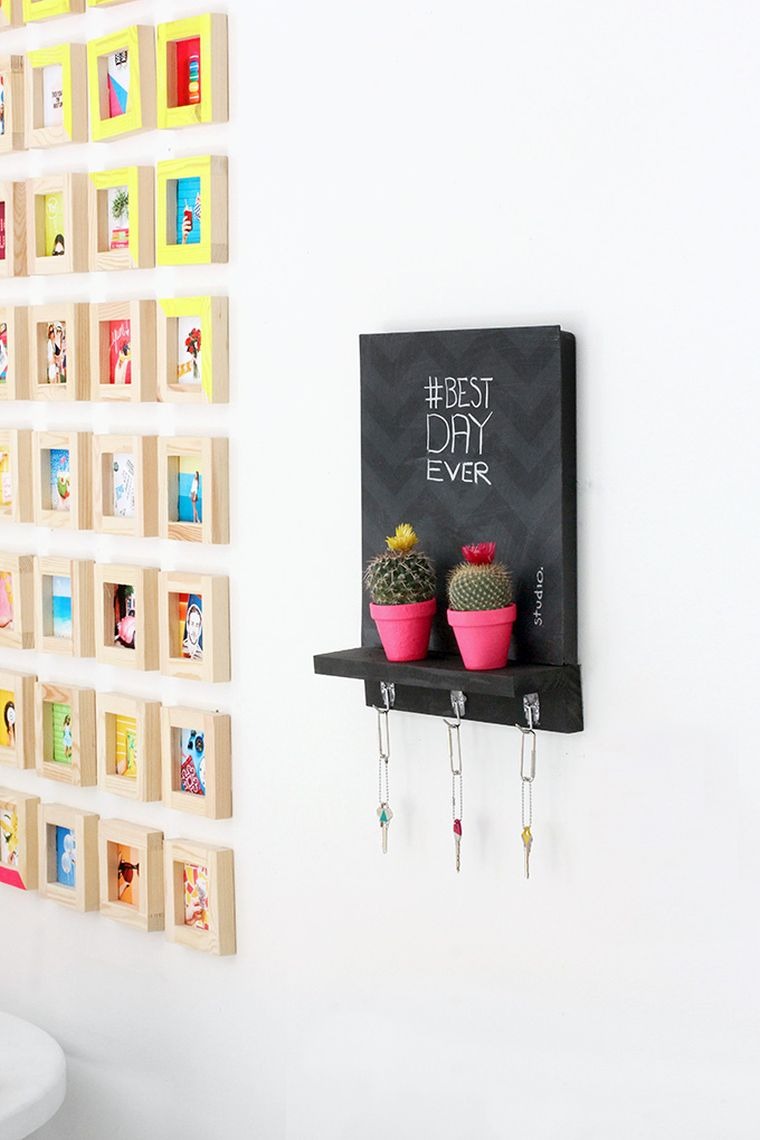 Do-it-yourself wall key holder: 6 original DIY decoration tutorials | 21/31
If you want to add a little more color to its DIY storage, it is adorned with mini flower pots and an original message to write with chalk.
Hanging wall for keys and accessories
View in gallery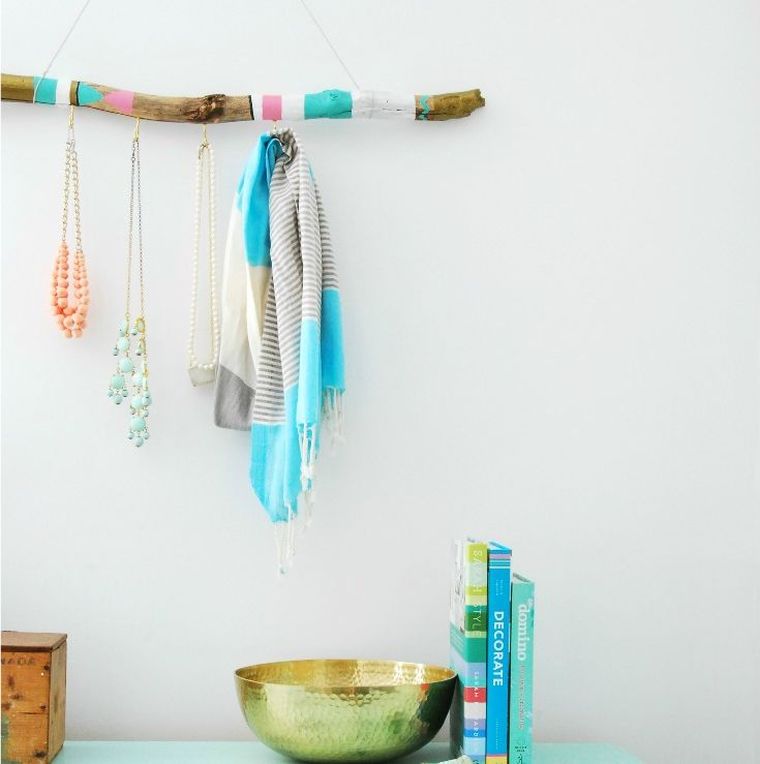 Do-it-yourself wall key holder: 6 original DIY decoration tutorials | 22/31
When you live near the sea or the ocean, you’ll enjoy invaluable DIY equipment: driftwood. This one can be used to make a lot of natural and cheap DIY decorative objects. The following tutorial provides an eloquent example.
View in gallery Do-it-yourself wall key holder: 6 original DIY decoration tutorials | 23/31
To make a chic and natural suspension to exhibit in his house entrance, we will need a branch of driftwood, acrylic paint, key hooks screw, a string to suspend the branch, a small brush, paint protection adhesive.
View in gallery Do-it-yourself wall key holder: 6 original DIY decoration tutorials | 24/31
The first step in this DIY wall key keychain tutorial is choosing a driftwood branch. It is therefore time to take a walk to locate the necessary equipment. Then, back in his workshop of manual activities and creative hobbies, we polish the look of the branch with sandpaper.
View in gallery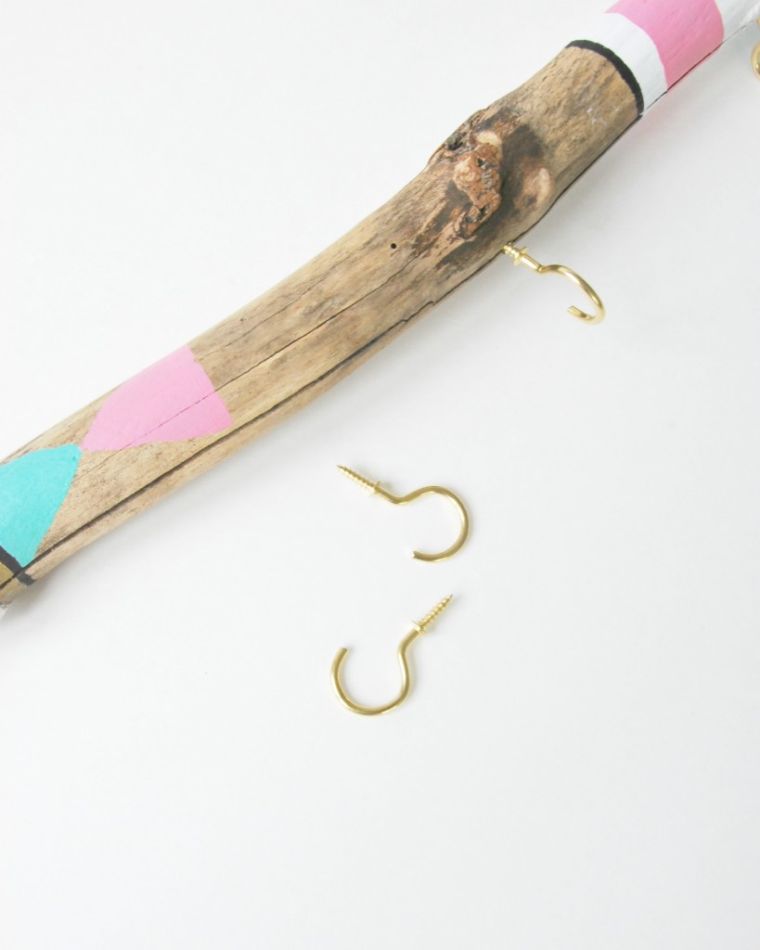 Do-it-yourself wall key holder: 6 original DIY decoration tutorials | 25/31
When the surface of the driftwood is quite smooth, the paint protection adhesive is used to create patterns. These are to be emphasized more with one or more colors of paint. Allow to dry and remove the protective adhesive before attaching the key hooks.
View in gallery Do-it-yourself wall key holder: 6 original DIY decoration tutorials | 26/31
We end up adding the string on both ends of the branch and by hanging his new wall key holder.
Realize a wall key holder – natural deco with wooden pegboard
View in gallery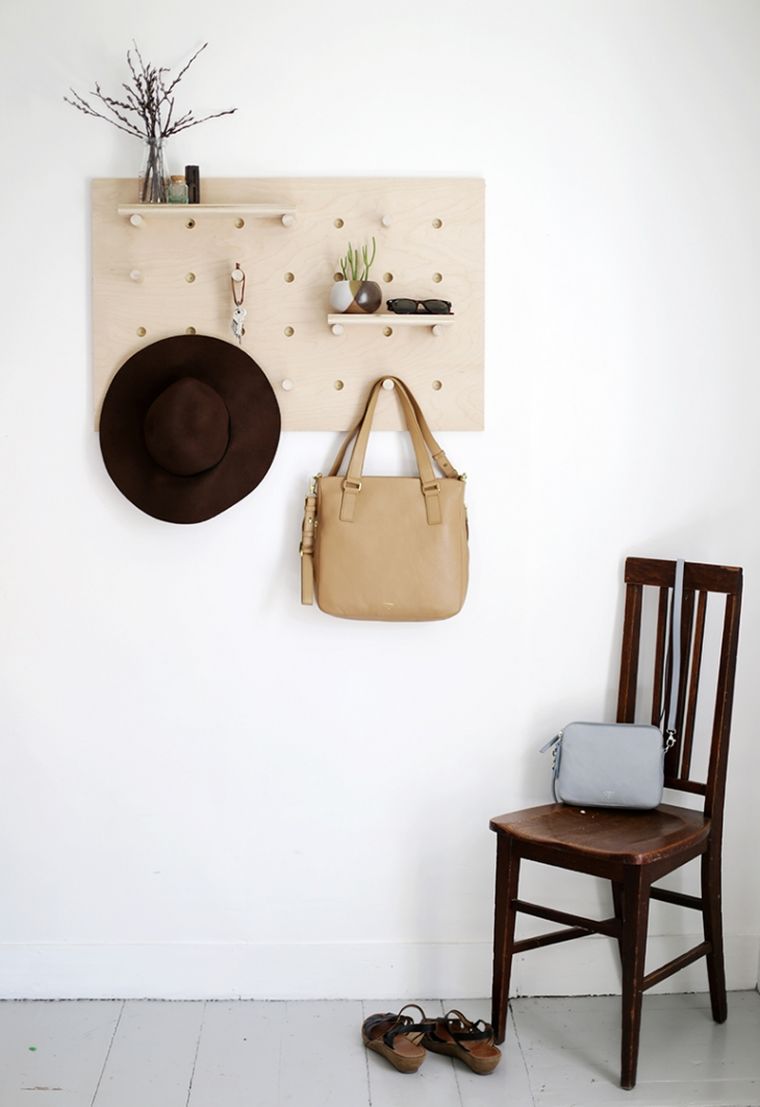 Do-it-yourself wall key holder: 6 original DIY decoration tutorials | 27/31
The pegboard is a multifunction panel that allows us to organize several small items such as our keys, glasses, scarves, handbags … The girls from The Merry Thought had the great idea to make a wooden pegboard they have used for the wall decoration of their entrance. We are inspired to offer such a storage and key wall DIY at home!
View in gallery Do-it-yourself wall key holder: 6 original DIY decoration tutorials | 28/31
Here is the list of materials needed for this project: a board of wood, dowels, a circular saw, a miter box, sandpaper, a folding meter, a pencil, a drill, a drill drill adapted, screws, a screwdriver.
View in gallery Do-it-yourself wall key holder: 6 original DIY decoration tutorials | 29/31
To create this keychain pegboard and wall storage, first cut the wooden board. Sand is quickly sanded with sandpaper. Then, we measure the wooden dowels to make holes of corresponding size. To do this, proceed as shown in the picture below.
View in gallery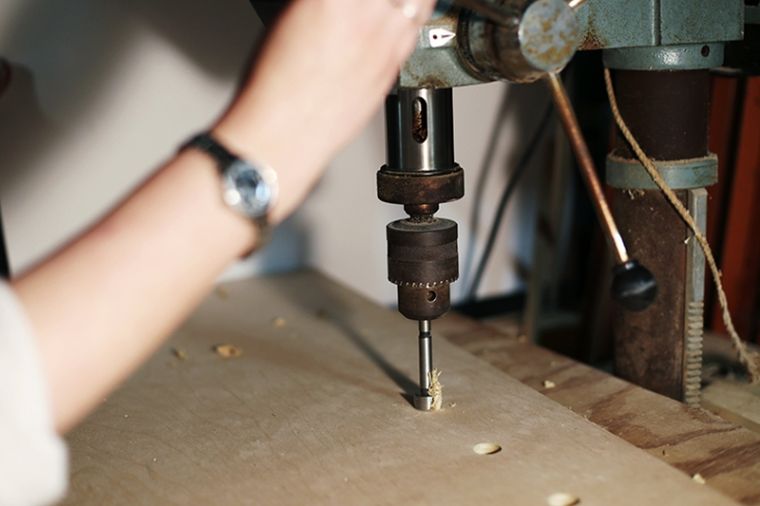 Do-it-yourself wall key holder: 6 original DIY decoration tutorials | 30/31
Using the remaining pieces of wood, cut one or two small shelves. We fix the pegboard on its wall and we add the pegs and shelves (sanded if necessary). And now, this wall storage is ready to welcome your keys and accessories!
View in gallery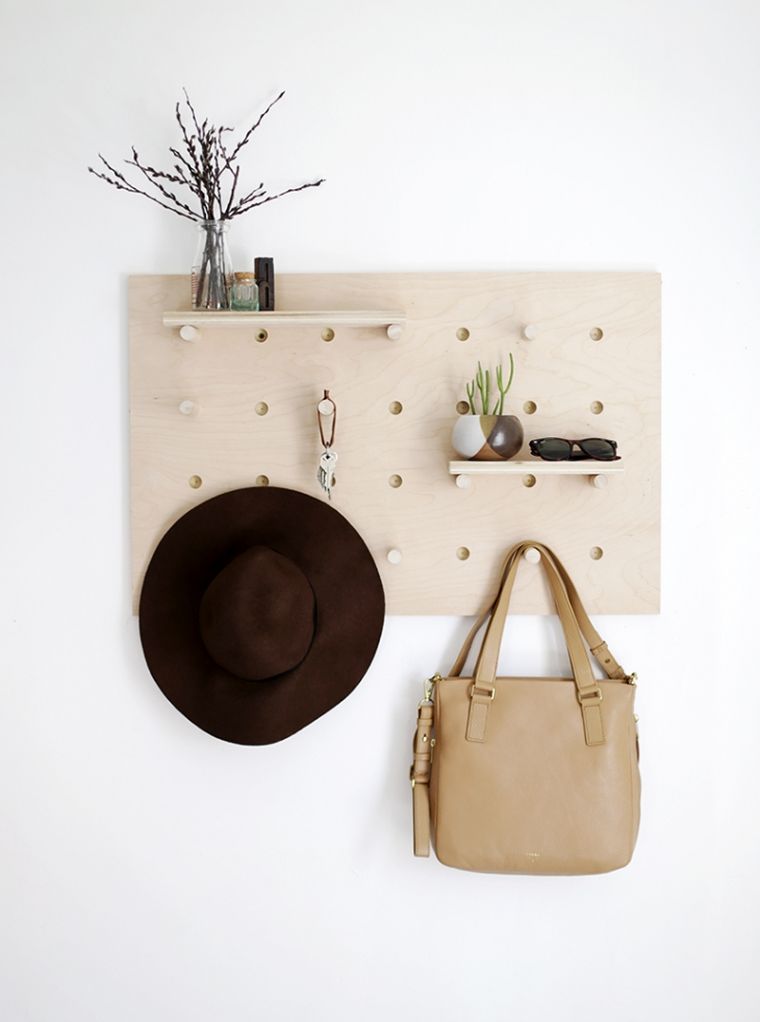 Do-it-yourself wall key holder: 6 original DIY decoration tutorials | 31/31
Claire Deschamps in